Home Shop How to Wear FAQ Share & Earn $5 Buy Now — $19.99 →
× How to wear the Shirt Tucker — 10-second step by step guide
Setup Guide

HOW TO WEARTHE SHIRT TUCKER

10 seconds in the morning. All day hold. Watch the video and follow the steps below.

5-Step Process

HOW TO WEAR THE SHIRT TUCKER

Tired of constantly adjusting your shirt? This discreet under-belt grips your shirt and anchors it below your waistband — preventing movement, bunching, and re-tucking.

How to wear the Shirt Tucker in 10 seconds — step by step photo guide
🔍 TAP TO ENLARGE
1
Wrap Around Your Waist

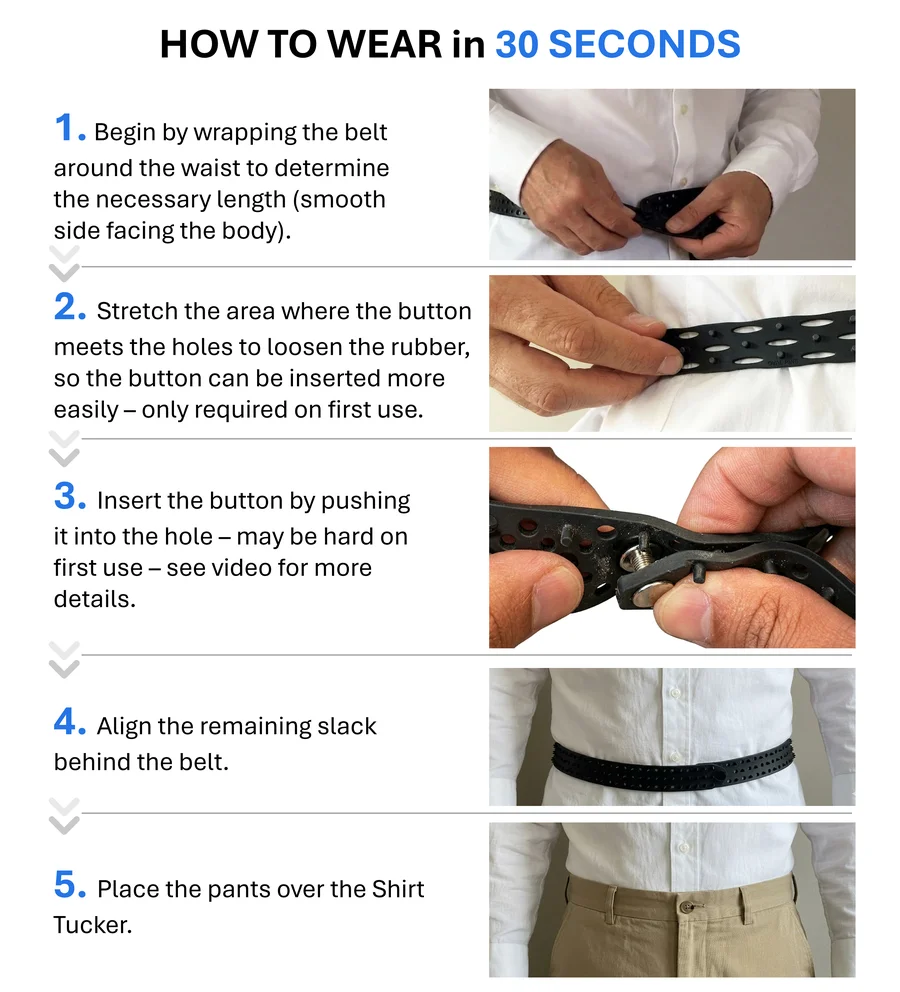
Begin by wrapping the belt around the waist to determine the necessary length — smooth side facing the body. Find the hole that aligns with your natural waist measurement.

2
Loosen the Rubber

Stretch the area where the button meets the holes to loosen the rubber, so the button can be inserted more easily. Only required on first use — after that the rubber is broken in and it takes seconds.

3
Insert the Button

Insert the button by pushing it into the hole — may be hard on first use, this is completely normal. The flex pegs grab the rubber and lock the button securely in place. See the video above for the exact motion.

4
Tuck the Slack

Align the remaining slack behind the belt — fold it neatly so it sits flat against your back.

5
Put Pants On Top

Place your pants over the Shirt Tucker and put your regular belt on top — the entire device is completely hidden. Hold lasts all day.

💡 First-time tip — the button feels stiff

On first use, the rubber hasn't been broken in yet — pushing the button through the hole will feel firm. This is completely normal. Stretch the hole a little wider than you need, push the button firmly, and it will click into place. By the second use it takes under 5 seconds.

First-Time Setup

HOW TO INSERT THE BUTTON

The first time can feel stiff — the rubber hasn't been broken in yet. Here's exactly how to do it. Takes 10 seconds once you know the trick.

1
Wrap to find your length
Begin by wrapping the belt around your waist to determine the necessary length — smooth side facing the body. Identify which hole aligns with your waist size.
2
Stretch the hole first
Stretch the area where the button meets the hole to loosen the rubber so the button can be inserted more easily. This step is only required on first use — after that the rubber breaks in.
3
Push the button in
Insert the button by pushing it firmly into the stretched hole — may feel hard on first use, this is normal. Watch the video for the exact motion. The flex pegs click and lock it in place.
💡 First-time tip: The button will feel stiff on the first use — that's the rubber being broken in. Stretch the hole a little wider than you need, push firmly, and it clicks in. By the second use it takes under 5 seconds.
Pro tips

WEARING TIPS BY SITUATION

For Golf

Position the belt slightly lower — just at the top of your pants — so it doesn't restrict hip rotation. Holds through every swing.

For Law Enforcement

Put the Shirt Tucker on before your duty belt. The rubber sits flat; the duty belt goes on over it. Stays put through a full 12-hour shift.

For Formal Events

Put it on after tucking your dress shirt but before trousers. The white version is nearly invisible under light dress shirts.

For Women

Works best with blouses with a longer hem. Position at your natural waist. The 22"–46" range fits all body types.

For Kids

Help younger kids the first few times. After 2–3 days they can do it alone. The 22" minimum fits most kids 6 and up.

Color Choice

Black for dark pants and uniforms. White for light or formal wear. Grey is the universal option that works with almost any outfit.

Quick answers

HOW-TO FAQ

About 10 seconds once you've done it a couple of times. First time may take 1–2 minutes as you find your size hole. After that it becomes muscle memory.
Yes. Wrap around your waist, reach behind to find the right hole, stretch and click. Watch the video above for the exact motion.
Just below the waistband of your pants, outside your shirt, under where your belt sits. Your regular belt covers it completely.
Yes. Position the Shirt Tucker at the natural waist for high-waisted bottoms.
Remove your regular belt, pinch the rubber near the metal button and pull it back through the hole. Takes about 5 seconds.
Yes — clean with a damp cloth or rinse under water. Wipe dry and air dry before wearing. Do not machine wash.

READY TO NEVER RE-TUCK?

10 seconds of setup. All day of looking sharp. $19.99 with free US shipping.

Shop Now — $19.99
✨ New & improved site — how are we doing?Give Feedback
Certain materials on this website, including text, images, and other media, may be generated or enhanced using artificial intelligence technologies. No representation or warranty is made regarding the accuracy, completeness, or reliability of such content. Individuals appearing in advertisements may be actors or AI-generated imagery portraying police officers, security guards, and other professionals.